Hey there! It’s getting colder and colder here every day and the holidays are approaching fast. I wanted to design a headband-style ear warmer that you could wear anywhere, but would also make a great gift. That’s when the Frost Headband was born!
This post may contain affiliate links for products that I use and recommend. If you make a purchase through one of my links, I may receive a commission at no extra cost to you. Thank you for supporting my small business! For more information, please see my disclosure policy.
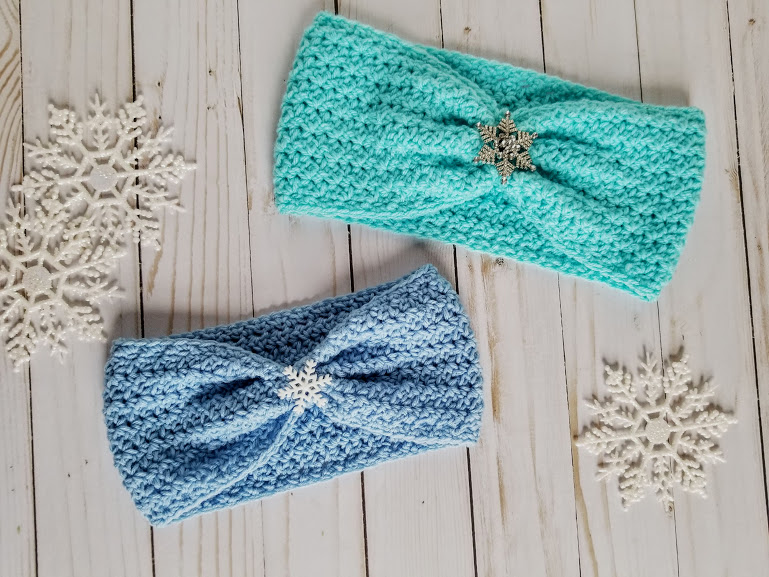
It’s got the perfect amount of bling (if you like that sort of thing 😉 ), comes in four sizes from toddler to adult, works up quickly and is super cute! Doesn’t get much better than that!

This pattern uses only single crochets and chains and is definitely beginner friendly. You also have the option to leave the headband full without the scrunched center if you prefer it that way. Here is what it looks like without the “scrunch”.

The Frost Headband is crocheted using size 3 light weight yarn to cut down on some of the bulk, but I’ve included some helpful tips in the Notes section of the pattern if you’d prefer to make the pattern using worsted weight yarn. If you want to make a worsted weight version, be sure to have a measuring tape handy to keep the measurements correct since the stitches will be larger.


The silver snowflake button was purchased at Wal-Mart in the button section of the craft department. It cost less than $3 and the headband was made using a sampler skein I purchased at Michael’s for a $1! So if you’d like to make some holiday gifts, this pattern will definitely prove to be the economical approach while still being thoughtful and made with love! I do love a bargain!

Oh, it’s just so pretty…I can’t wait to wear it!!! I hope you enjoy the Frost Headband pattern!
Add this project to your Ravelry queue here…

PIN THIS PATTERN TO PINTEREST HERE
Frost Headband
Materials Used:
- 1 oz. of N Studio Samples by Nicole (No color name) – 158 yds/144 m – 50 g/1.75 oz. (for Adult size)
- Almost 1 oz. of Baby Bee Sweet Delight in Baby’s Blue – 4 oz/115 g – 377 yds/345 m (for Child size)
Or any size 3 light weight yarn. - H/8 (5.00 mm) crochet hook — My favorite hooks! I use them daily!
- Snowflake shaped button
- Tapestry needle
Finished Size Approximately:
Toddler – 3.75” Width x 17” Length/Circumference
Child – 4.5” Width x 18” Length/Circumference
Teen – 5” Width x 20” Length/Circumference
Adult – 5” Width x 21” Length/Circumference
Gauge:
16 single crochet stitches and 17 rows in a 4” (10cm) square.
Abbreviations:
FC – foundation chain
ch(s) – chain(s)
st(s) – stitch(es)
sc – single crochet
sl st – slip stitch
Notes:
- This headband can be made in 4 different sizes. The pattern numbers for each size will be given as toddler first and child, teen and adult in parenthesis.
- I recommend circling or highlighting the size you’re working on to avoid confusion.
- If you’d like to use this stitch pattern to create a custom size or for any other project, simply start with a multiple of 3 chains for your FC.
- If you’d like to use worsted weight yarn, please remember that your finished project will be slightly larger than the examples. You may want to size down one. For example, if you are making an adult or teen size with worsted weight yarn, try using the FC for the child size headband, which is 21 chains. Then measure your headband to ensure you get the proper length. If making toddler size in worsted weight yarn, try a FC of 15 (toddler size 18 – 3 = 15).
*** American crochet terms used throughout.
Instructions:
FC: Ch 18 (21, 24, 24)
Row 1: In 2nd ch from hook, sc. Skip next ch, (sc, ch 2, sc) all in next ch. *Skip 2 chs, (sc, ch 2, sc) in next ch* Repeat from * to * across until 2 chs remain. Skip 1 ch, sc in last ch. Turn.
Row 2: Ch 1, sc in same st ch 1 comes out of, *(sc, ch 2, sc) in next ch-2 space from previous row.* Repeat from * to * across until 1 st remains. Sc in last st. Turn.
Repeat Row 2 for 60 (62, 66, 68) rows.
Finish off. Leave a long tail for sewing. Fold the headband over so that the two ends are touching. Make sure you don’t twist the headband.

Using a tapestry needle and the long tail, whip stitch or mattress stitch the two ends together.
Flip the headband Right Side out with the seam on the inside.
Trim
Attach yarn in any st along the edge of the headband. Sc evenly around the edge. Sl st in the first sc made of the round.
Repeat on the opposite edge of the headband.
Fold the headband like an accordion along the seam as shown in the photos below. (Folding along the seam hides it.)

Using a tapestry needle and yarn, stitch the folds together as shown in the photos below. Run the needle from the top, through every fold, and out the bottom. Working a quarter inch to the left or right, run back up through again and then another quarter inch beside that, run through again. Stitch at least 3 – 4 times. Tie off and weave in the ends.


Using a sewing needle and thread, stitch your button in the center of the folds facing outward on the Right Side of the headband as shown in the main photo.
I hope you’ve enjoyed the Frost Headband pattern!
***Click here for the ad-free, large print PDF from Etsy***
***Click here for the ad-free, large print PDF from Ravelry***
Don’t forget to follow along with me on social media, Pinterest and by signing up for my Newsletter where every week you get the latest pattern sent straight to your inbox!
